
This page documents my attempts to grow gourmet wood loving mushrooms without using disposable plastic bags. The idea is to fill plastic tubs with substrate then make a load of holes evenly throughout the substrate. I then pressure cook the sealed tub to kill any contaminants. Under sterile conditions I open the tub and pour grain spawn into the holes, dispersing it throughout the substrate. I then let it colonise as normal, before fruiting it out of the side or top of the tub. I have now actually grown mushrooms semi successfully using this technique so I thought I would share it and see if anyone else has any ideas or contributions or wants to give it a go themselves.
Lots of people grow oyster mushrooms in buckets on straw. This doesn’t produce plastic waste which is good, however this method is rarely used by commercial growers. The method isn’t sterile, so you have to grow on a less nutritious medium such as straw. This limits the risk of contamination as there isn’t much for the competing organisms to eat but it also limits yields as the mycelium also has to make do without nutritious food. This method is also typically only done with oyster mushrooms as they are particularly resourceful and able to fruit off less nourishing substrates.
Most commercial gourmet growers fill single use polypropylene bags with highly nutritious substrates, sterilise the bags to remove competing organisms then introduce mycelium growing on grains into the bags. They shake the whole thing up to disperse the mycelium evenly throughout the bag, leave it to colonise then cut slits into the bag for mushrooms to grow out of. This works very well, keeping everything in a bag that can be pressure cooked removes any contaminants and being able to easily shake the bag and grain spawn mix gets the mycelium really dispersed through the substrate so it colonises quickly. The downsides to growing in bags is the plastic waste, also the bags aren’t cheap.
There is a highly automated method where mushrooms are grown in reusable plastic pots. The pots are filled with substrate with a hollow space left in the middle. They are then sterilised and, in a clean room, the hollow is filled with grain spawn. The pots are then left to colonise and are fruited out of the top. The pots used are quite small so they are only good for one fruiting before they are spent. The pots probably don’t colonise as fast as in plastic bags as the spawn is concentrated in the hollow in the middle of the pot and the mycelium has to work outwards, I think this limits the size of the pots so to make up for the small, single fruitings and make it economical you have to have to do this on a massive scale, which is possible with expensive machinery but the labour involved isn’t practical for small to medium sized growers.
I want to grow mushrooms in reusable containers, with a highly nutritious substrate so I get large flushes and maximise the amount of mushrooms grown. To do this I fill tubs with substrate then use a spiking device to make a load of holes through the substrate which I can pour grain spawn into.
The method is:
- Fill the tub with dry substrate ingredients, hardwood pellets, soy hulls, wood chips, sugar beet pellets are all things I have used.
- Add the water and mix well, it can’t be mixed after it’s cooked. Sometimes I use boiling water so the pellets break apart instantly, other times I add the water and leave it for half an hour before mixing to give it time to soak up the water.
- I then use the spiker to make the holes. There is a tendency for the substrate to clump and stick to the spiker, I have found it works well if I repeatedly press then remove, going a few cm at a time until I reach the bottom of the tub. Obviously try and be a bit gentle with the tub until it’s inoculated so you don’t collapse the holes.
- I then put the lid on the tub and pressure cook it. To keep the filter dry I put a piece of tin foil over it, I also put a jar lid under the tub to tilt it, so condensation runs down away from the filter.
- Once it’s cooked and cooled it can be inoculated. I do this in a still air box. I shake up my grain spawn to separate it, this doesn’t work if it’s all one big solid clump. I open the lid of the tub and pour the spawn over the substrate, shaking it so it goes down the holes as much as possible. Once the lid is back on I tend to slam the tub down onto the table a few times to try and remove any cavities.
- Leave it for a few weeks to colonise, then open the holes or fruit out of the lid.
- Afterwards you can wash the tub and start again.
The pros that I can think of:
- You can reuse the containers, reducing waste and costs. The tubs I use cost £1.52 each, which is only slightly more than a grow bag and they can be reused.
- The bags don’t have to be shaken, opening the lid of a tub and pouring in some spawn is quicker than opening a bag, pouring in the spawn, sealing the bag and vigorously shaking it.
- The tubs can be stacked, saving space when colonising.
The cons that I can think of:
- The substrate has to be mixed in the tuba and you have to make the holes, you can’t just dump it all in a bag and mix it up when the spawn is added.
- You probably need to wash the tubs between each use, which is quite a lot of labour if you’re growing lots of mushrooms. This may not be necessary if everything’s going to be pressure cooked, but I haven’t tested this.
- You need the grain spawn to be quite separate still so it can go into the holes. When I’m using bags I smush up the clumps of grain spawn through the bag before mixing everything, however you can’t do this with a tub. You have to use the spawn before it goes too matted and stuck together. This wouldn’t be a problem if the spawn was grown in a bag rather than a jar but that introduces more unnecessary single use plastics.
- When fruiting out of tubs I tend to get lots of pins in the tubs and it shrinks away from the holes, my bags often get pins in them too which is annoying but you can pull the bag tight against the substrate as it shrinks, which you can’t with a tub.
The Spikers
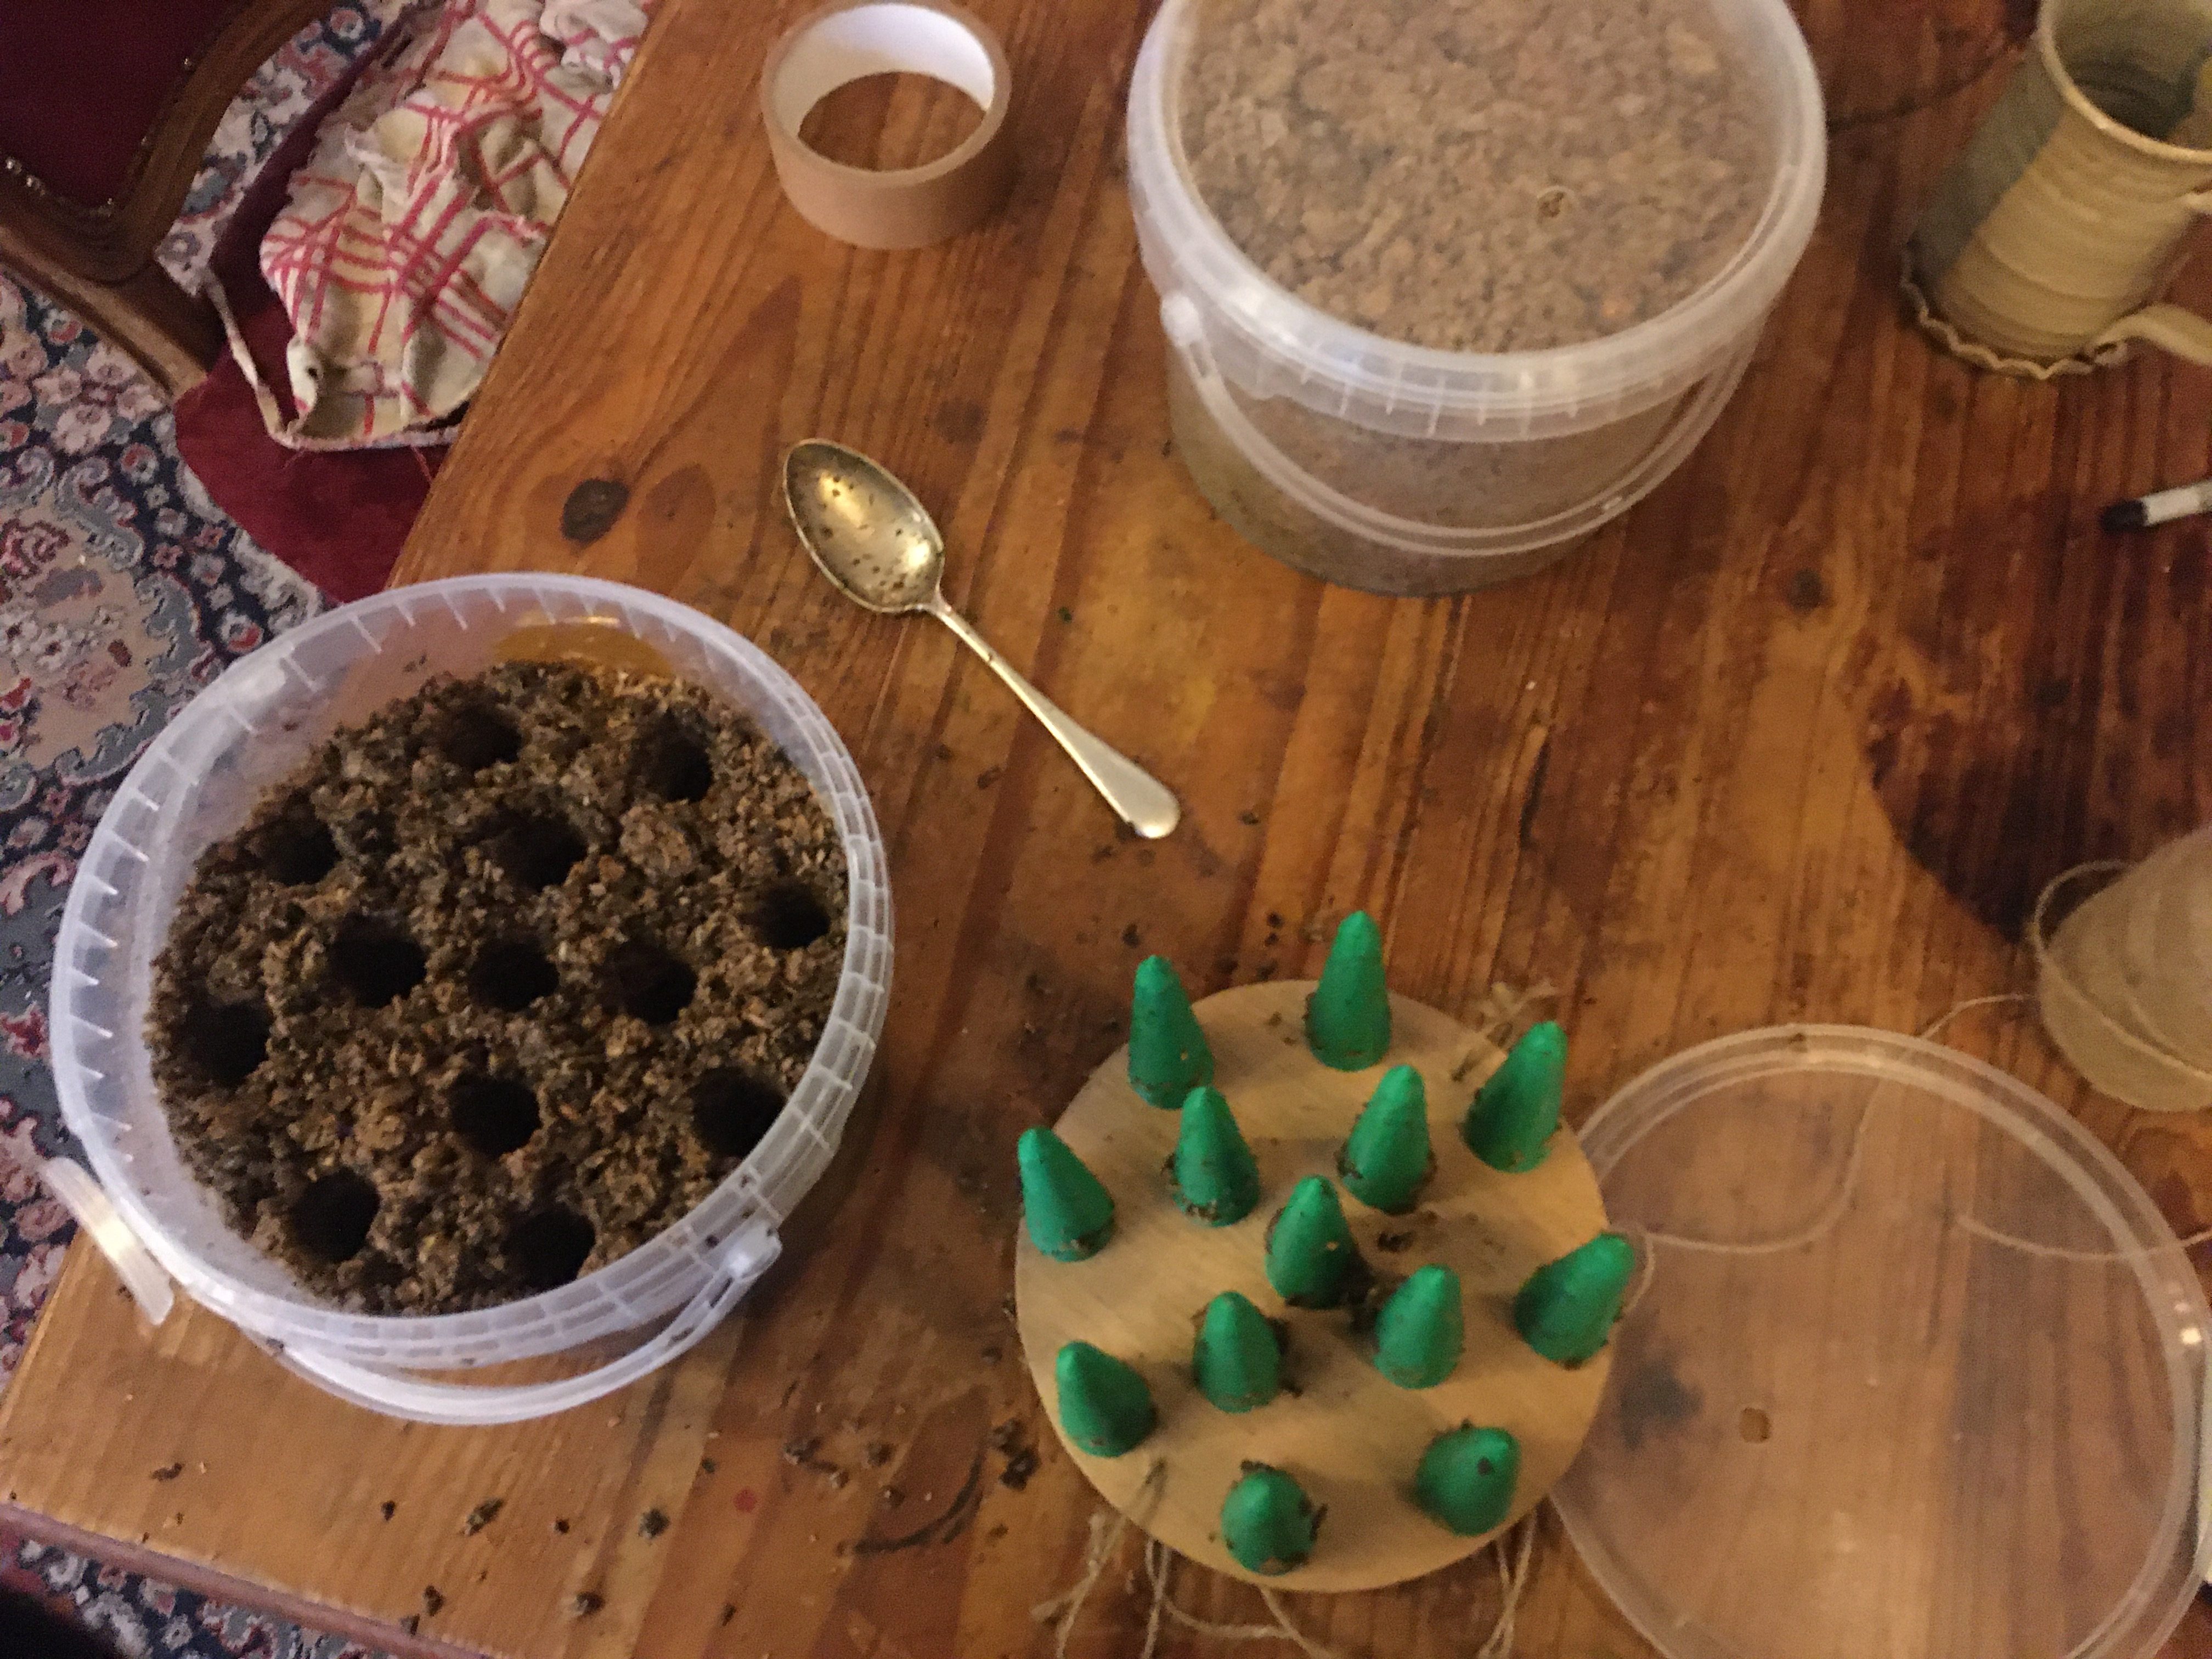
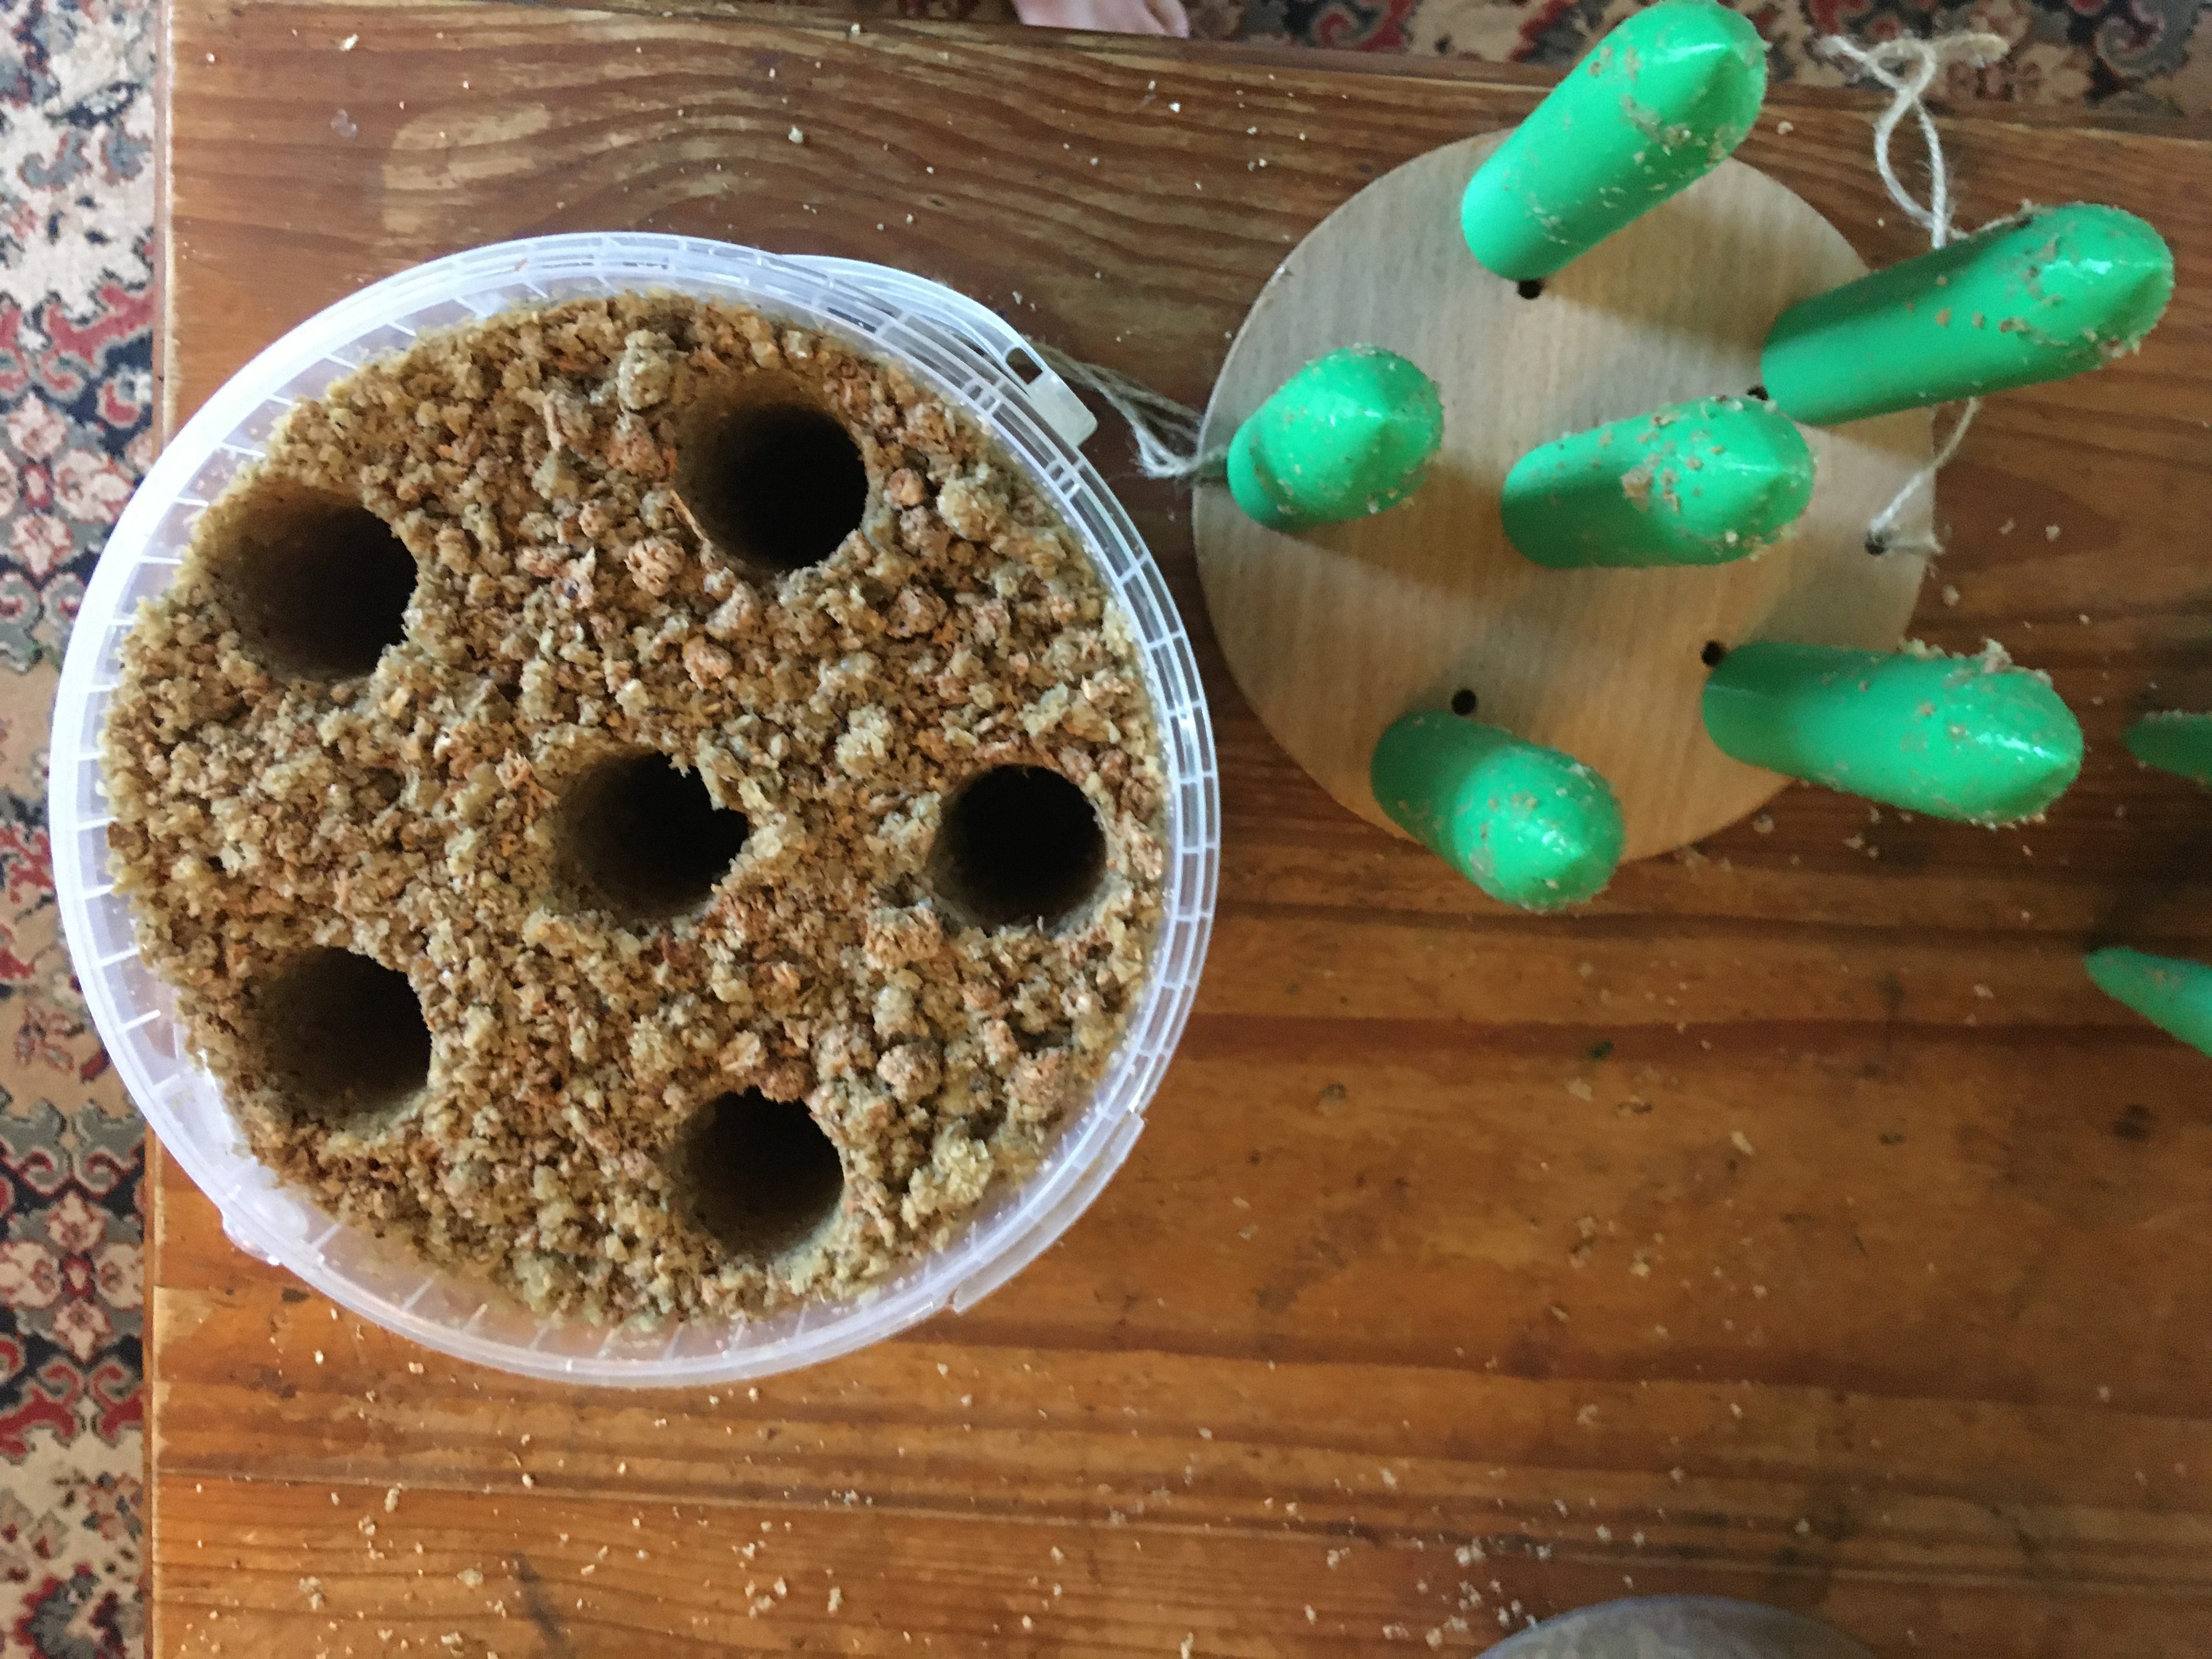
To get the spawn dispersed throughout the substrate so it colonises quickly without having to expose it to anything non sterile I make a load of holes for the spawn to fall into before sterilisation. This is similar to the process of growing mushrooms in pots, but as there are many holes larger tubs with more substrate can be used while keeping the distance the mycelium has to travel low. Being able to use larger tubs reduces the labour per tub and is what makes this method a possible alternative to growing in bags.
For want of a better name I call the thing that makes the holes a spiker.
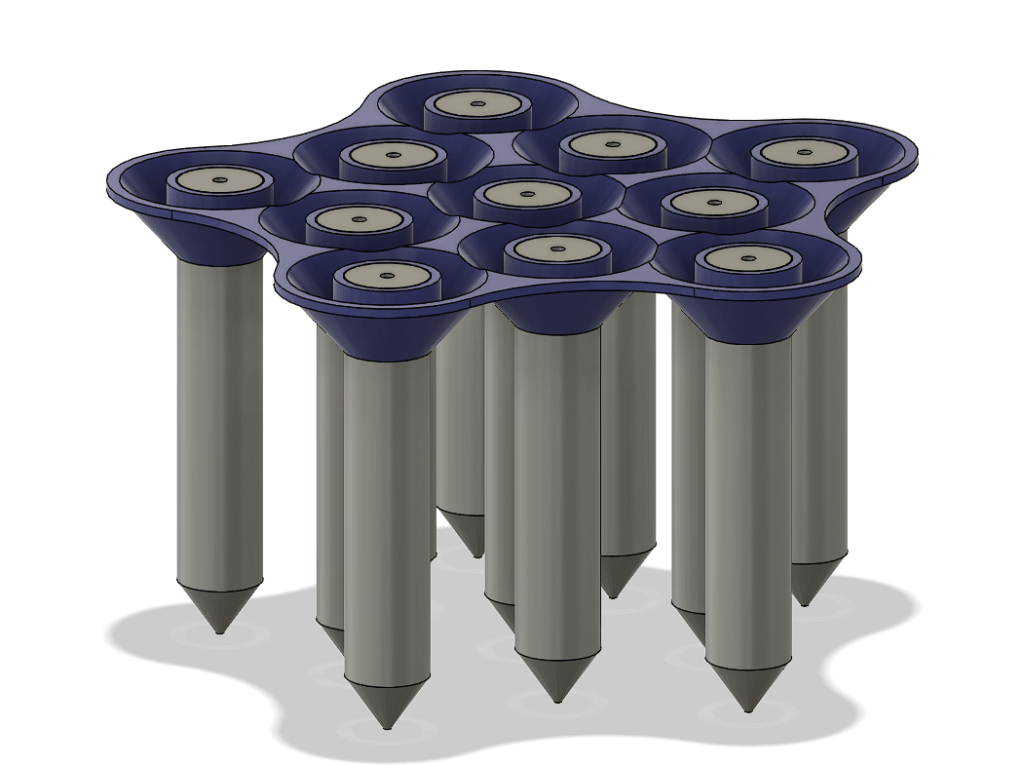
I used my 3D printer to make the spikes. I design the volume of the spikes to be a bit more than the volume of spawn I want to use in the tub, so there isn’t lots of empty space nor is there a load of spawn sitting on top of the substrate. I attach each spike to a plywood disk with wood screws. There are a couple of string loops on the plywood to pull it out with.
Using 3D printing allows me to make each spike the same with very little effort, I can precisely know the volume and engineer the shape. What’s not ideal is that they aren’t smooth. 3D printing produces layer lines, which are little ridges on the part. These increase the friction. and make the substrate want to stick in between the spikes and get pulled out with the spiker. Going up and down repeatedly when pressing the holes helps prevent this, as does the shape of the spiker, and I think with more prototypes and thinking I will be able to figure out a shape where this isn’t an issue. I have used substrates with big bits of chipped up wood, several cm across and I was able to make the holes with the spiker by wiggling it to push the wood out of the way.
The first one I made had 6 spikes and straight sides. The second one had 13 smaller spikes with angled sides, I thought this would be easier to remove without taking the sub with it, but it was worse, I think the angled sides to the spikes compressed the substrate near the top and acted more like a wedge than like mould release angles which is what I was hoping for.
The third iteration (which only exists in my mind and my computer so far) has a separate plate that holds the top of the substrate down as the spikes are removed and creates a funnel shape to guide the spawn into the holes.
The Tubs
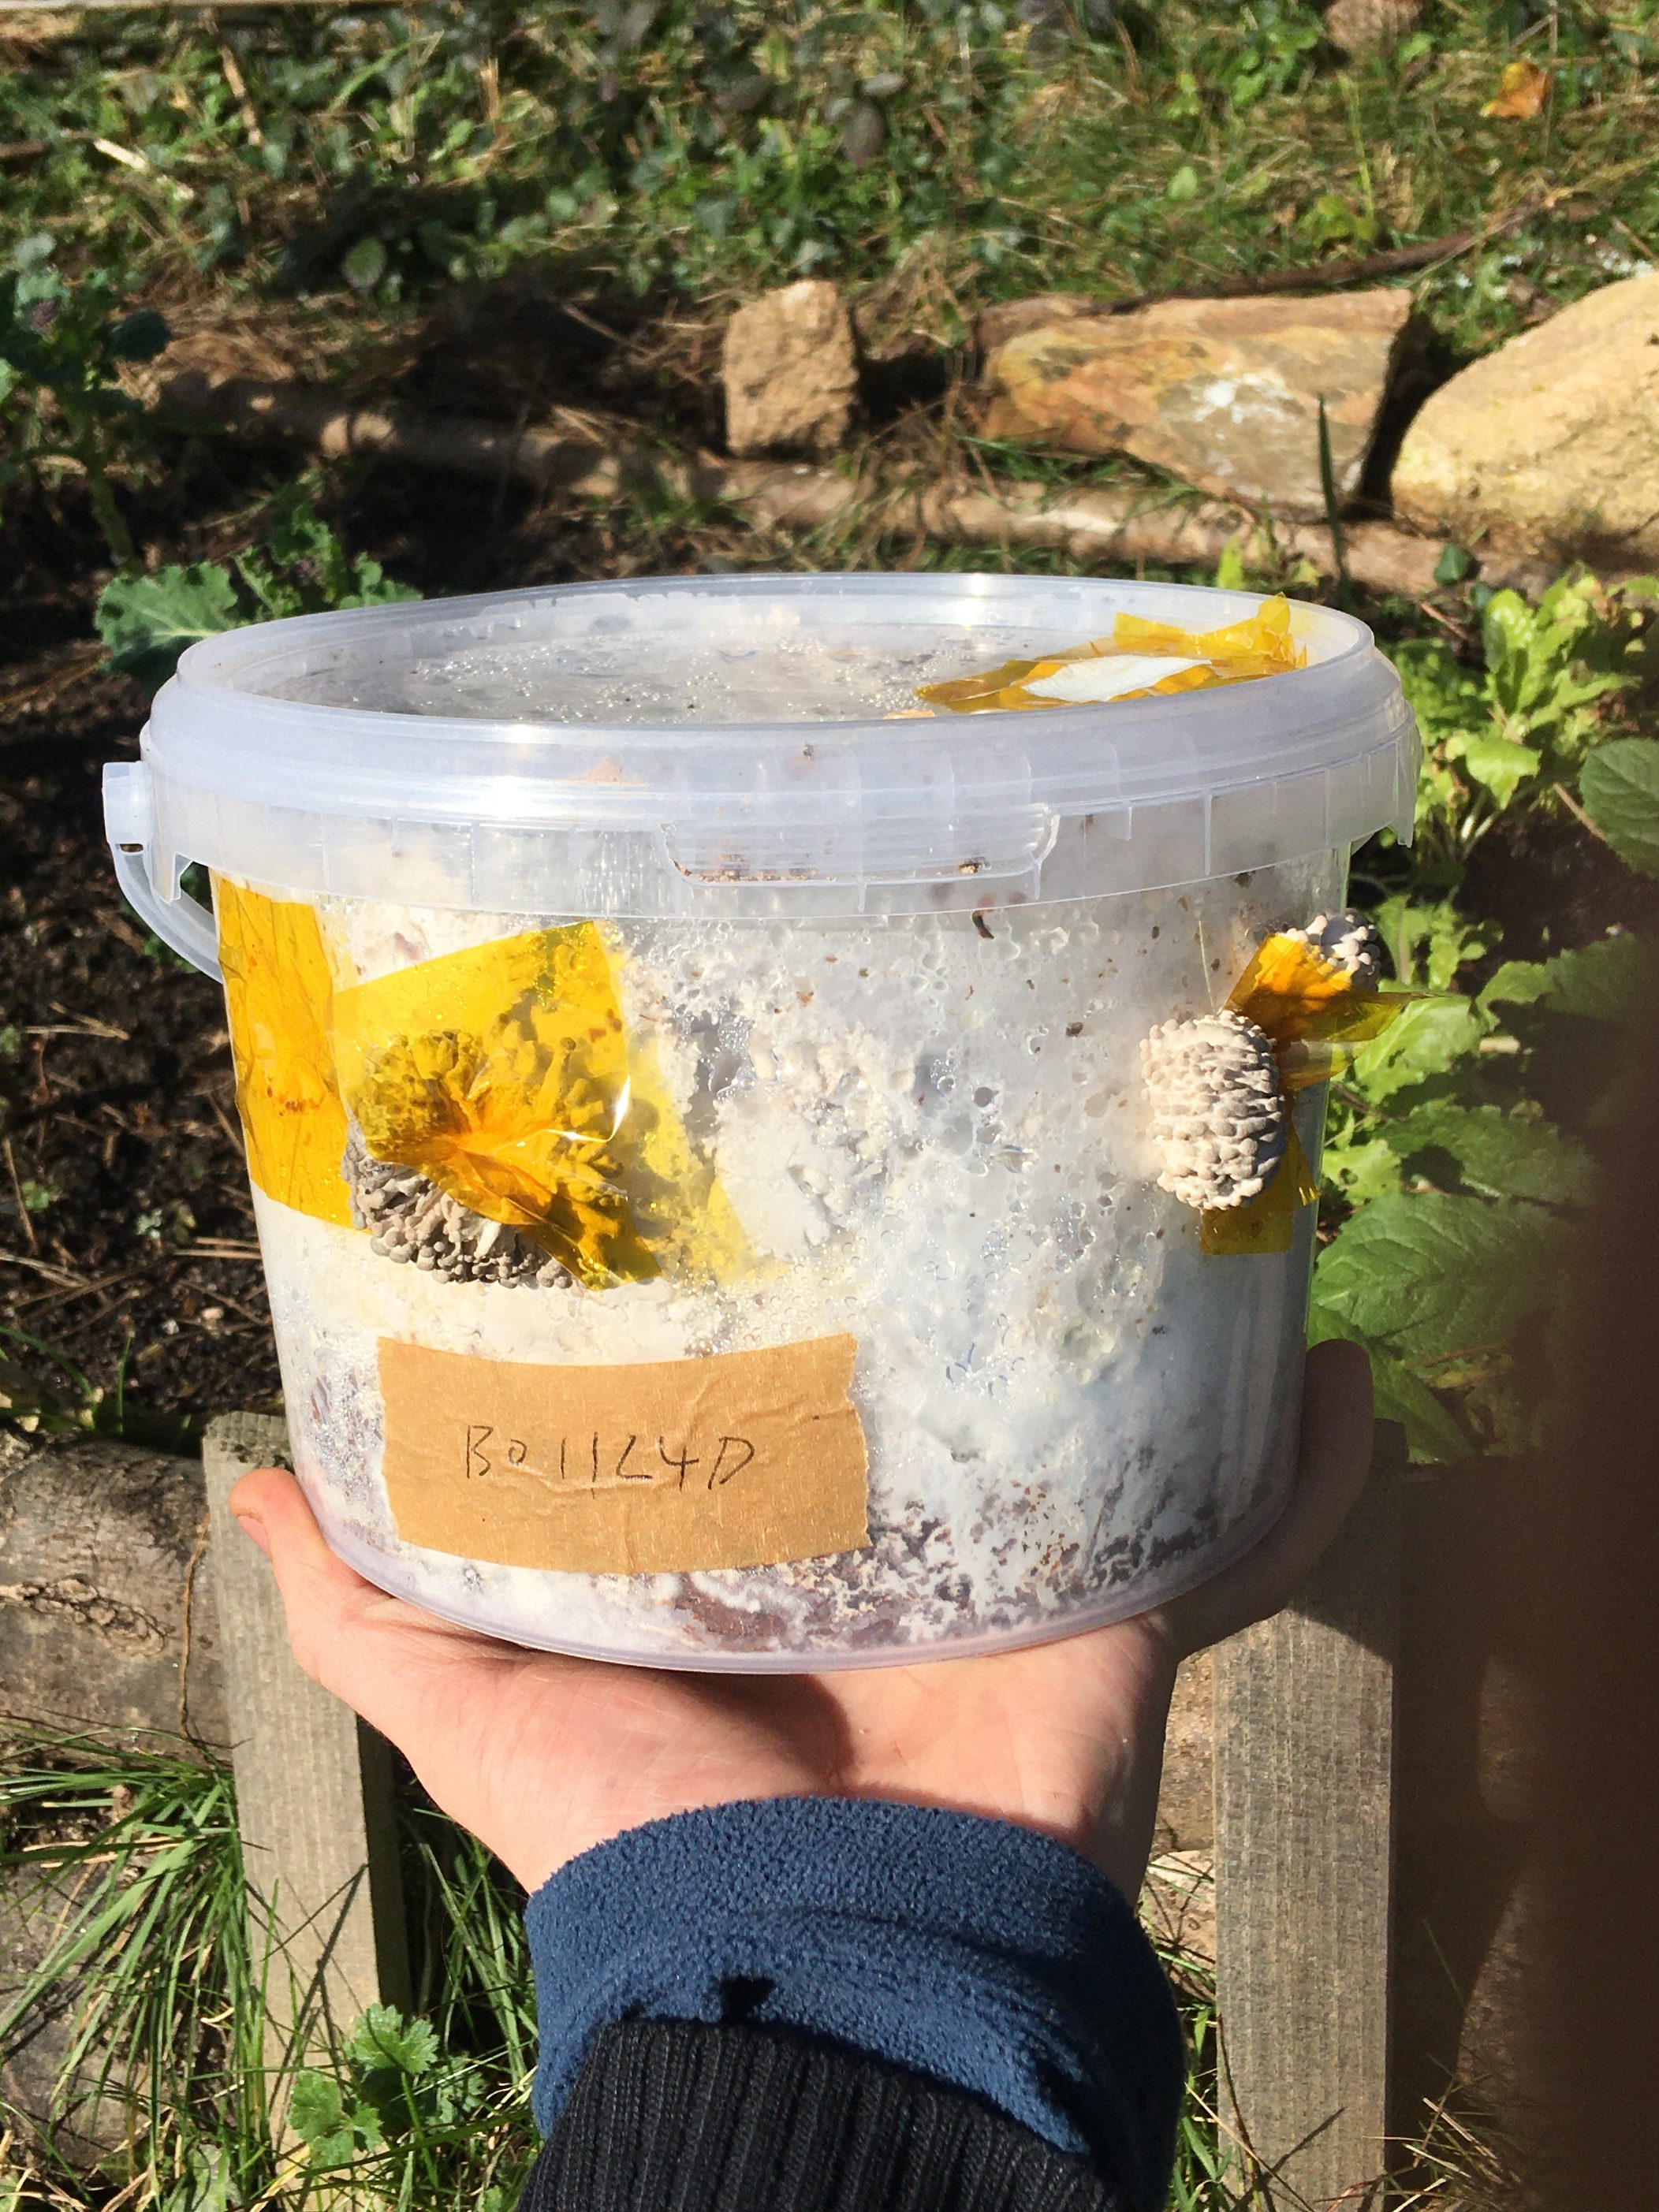
I have bought some 3 litre plastic tubs, they are made out of polypropylene (PP5) which is food safe, can withstand sterilisation temperatures and is clear, so I can see when they are colonised and if there is any contamination. To provide some air to the mycelium a filter is fitted. My first filter attempt was to cut a hole then use silicone sealant to glue on a filter cut off a used grow bag. This didn’t work as silicone doesn’t bond to PP5. I then tried using kapton tape to hold the filter down, which had a tendency to form ripples in the pressure cooker but did work to an extent if it was smoothed down again immediately after cooking. I have also jammed a wad of polyfill into a hole in the lid and this worked well.
I used 3 litre plastic tubs as they fit into my small pressure cookers, I filled them with around 2 kg of substrate, which is a bit less than I’d like and I suspect this impacts my biological efficiency. When I build a steam pasteurisation barrel I will try with some bigger tubs and this will produce a better comparison to the 3 kg grow bags I routinely use.
I cut holes into the sides of the tubs for mushrooms to fruit out of, and covered these holes during colonisation with either kapton tape or aluminium foil tape, both of which can withstand the heat of sterilisation. The aluminium tape is a bit delicate and the kapton goes all wrinkly so neither is perfect. Mushroom pins have grown out under the kapton tape, this means it’s not airtight and therefore is a place that contaminants can enter the substrate.
Filters only work if they are dry, so I tilt the tub so condensation runs away from the filter when it’s being cooked and put a piece of tin foil over it. I had one tub where the filter got wet and it grew green mould in it but it did eventually fruit anyway.
Fruiting
I intended to fruit out of holes in the sides of the tub, as I have seen people do with bucket grows, this didn’t work very well, as the substrate dries it pulls away from the sides and pins form all over the place inside the tub, not necessarily at the holes. I successfully fruited some by opening the top of the tub and leaving it on its side (I was growing oysters that naturally grow out of the sides of trees so it’s best to fruit them out of a vertical plane) and this worked to an extent, though having this much mycelium exposed dries it out and I think makes it more prone to contamination, as there is a much larger area over which the mycelium has to fight off attackers. I suspect these issues have been solved by experienced tub growers, I did a little bit of research but just found loads of blogs that have lots of SEO and not much information but I should dig deeper.

My best flush so far was 350g of brown oyster mushrooms. I took the lid off and put it on its side and the mushrooms grew out of the top. The substrate contained 300g of hardwood fuel pellets, 300g soy hulls and 1.5 litres of water inoculated with 120g of homemade spawn. I picked the mushrooms 45 days after inoculating the tub, which is quite a long time but my house is quite cold. This isn’t brilliant, I’ll wait for subsequent flushes before calculating the biological efficiency but I’d be very surprised if it’s over 100%. The block felt very dry, perhaps because it was fruited out of the top so there was a large surface area for water to evaporate from.

Another grow produced only 133g of mushrooms, this was with a similar recipe but with some of the fuel pellets replaced with chipped fresh sycamore branches.
I think I have been making my substrate too wet, colonisation tends to stop before reaching the bottom of the tub, presumably because the excess water has pooled down there. I would assume that it wasn’t fully colonised then mushrooms would start pushing their way out past the filter or out under the lid. It’s impossible to separate the limitations of this method from me just not being very on the ball recently, but I will do more grows and continue collecting data.
I have some Lions Mane slowly colonising in a few tubs. I made some Buna Shimeji tubs months ago and I will try and fruit them soon. I haven’t had any success fruiting Buna Shimeji in bags, I think perhaps it has to run out of food before it will fruit so this takes a long time in a 3 kg bag but presumably less time in a 2kg tub.
So I think fruiting out of tubs like these certainly has potential. It remains to be seen whether I can get yields like those I get growing with bags in the traditional way. I wouldn’t say that the labour involved in growing in tubs was much more than using bags, you don’t have to shake the tubs to disperse the substrate which I find to be quite hard work, but probably the tradeoff is they take more time to colonise.
The obvious thing to do is make bags and tubs with the same weight of the same substrate in each and compare their colonisation time, contamination rate and yield. I did this with a shimeji grow but I didn’t pay very close attention to how they were doing and I haven’t put them into fruiting conditions yet.
I opened a tub this morning (13 March 2024) by cutting a cross into the aluminium foil tape on the side, and I will see if this produces a decent sized flush without drying the substrate out too much.
It’s a pretty simple idea so I doubt I’m the first person to try this, if anyone else has I don’t know about it and I would be very interested in learning more so if you are aware of anything similar please let me know. If you’ve got any questions, suggestions or encouragement feel free to contact me. Thanks everyone.

