This page provides an in depth look at how the Cave Box works. A great deal of thought went into its design and I am quite pleased with how it turned out.
Humidification
Mushrooms need a humid environment. The Cave Box uses an ultrasonic humidifier to add water vapour into the air. Ultrasonic humidification uses an oscillating electrical signal to drive a piezo disk covered in tiny holes that are only 5 millionths of a meter across, producing a fine spray of water droplets. A fan blows air from outside the box, mixing the water vapour and dispersing it within the grow chamber. The shape of the housing makes use of the Venturi effect; as the air passes over the mister the chambers radius decreases, which decreases the pressure. Water boils more easily at low pressures so the shape of the chamber makes the spray of mist evaporate even more, producing humid air rather than air with drips in it.
The Cave Box uses a DHT22 sensor to measure the humidity. These sensors are cheap and readily available should you want to get a replacement for your Cave Box. They have a repeatability of 1% and can measure over the entire range of possible humidities.
The humidity sensor is used with a PID controller, which allows for a smooth approach to a desired humidity and it can be tuned (by setting 3 numbers found in Settings->Advanced->Edit PID Variables) for the best performance i.e quickly approaching the desired humidity without the humidity overshooting or oscillating. There is plenty of information online explaining how to do this. However this is only really relevant to those who want really precise control of their chamber. The ideal PID tuning depends on the size of the grow chamber so it can’t be perfect for everyone out of the box. For most users the stock tuning will work well enough and if you want the best performance the option to tune the controller is there.
A computer fan is used to disperse the water vapour coming into the chamber and bring in new air so your mushrooms can breathe. It has a 3D printed filter on the inlet, the main purpose of which is to keep out fruit flies and fungus gnats. The fan comes on a set number of times per hour (Settings -> FAE Per Hr). To decrease the CO2 the user increases how often the fan comes on. I did it this way as this allows me to use the values given in Paul Stamets excellent book Growing Gourmet and Medicinal Mushrooms to set the CO2 levels for various mushroom species. These are the values used for the presets that come programmed onto the device.
The length of time that the fan comes on for is set by running the Calibrate FAE option (Settings->Calibrate FAE) , this routine first measures the humidity in the box, then increases it to the current set point, then runs the fan until the humidity in the box is halfway between the initial humidity and the final humidity, meaning that the entire chambers volume of air has been pumped into the box, as it’s mixed with the wet air half of the air leaving is dry and half is wet, so this is why the Cave Box measures the time for the humidity to half. When the routine has finished the variable found under Settings->Advanced->FAE On Time will be updated. You can overwrite this with whatever value you want.
Why not add a CO2 sensor? I didn’t because CO2 sensors are actually quite sophisticated and it would be the most expensive component in the Cave Box, unnecessarily increasing its price for something I don’t think is necessary for most mushroom growers, I have been growing mushrooms in Cave Box enclosures for months now and haven’t had problems with high CO2 except when initially dialing in the device.
However I do intend to add a CO2 sensor in the future as an optional add on device that plugs into the existing humidity sensor port on the Cave Box, so anyone who want CO2 measurement can have it, anyone who already has a Cave Box can buy the add on and install a software update to add CO2 sensing to the device they already own, and anyone who doesn’t want to pay for a CO2 sensor doesn’t have to.
Electronics

The electronics for the Cave Box is quite simple. Its brain is an ESP32 development board, it uses a rotary encoder for user input and has an OLED screen. The Cave Box runs on 5V, through a micro usb port. As most people already have a spare micro usb cable and a USB wall charger I don’t include these as it’s silly for me to buy them and pay the shipping to then have to pay shipping again to send them to you, it’s also a bit better for the environment if you can use something you already have instead of buying a new thing.
The ultrasonic mister needs a fairly high voltage to get any significant amount of water vapour, an 80V square wave of about 110KHz is about right, so the voltage needs to be stepped up quite significantly. I first attempted to use a tank circuit, which is an inductor that resonates with the capacitance of the of the humidifier disk, so a 5V square wave input builds up to 80 or 90 Volts, this is how piezo buzzers are often driven and it works very well when the cotton wick isn’t attached, but with the wick supplying water it gets damped so much that it’s only around 15V and the mister makes a tiny dribble of water vapour.
I decided to buy ultrasonic mister modules instead. They use a tiny transformer instead of a tank circuit and they are available for only a few pounds. I remove the microcontroller and button from these modules and add a connection to the ESP32. It would have been more elegant to not use the module, but the main tangible benefit I see is that the circuit board could have been smaller, it likely would have made the Cave Box more expensive due to the increased time needed to assemble the boards. Similarly I would have preferred to not have an ESP32 development board soldered onto my circuit board, but buying the peripheral parts would have likely cost more than buying a fully assembled development board, and increased the development and manufacture time of the Cave Box. Using off the shelf modules also makes the Cave Box easier to fix and easier to cannibalise its parts at the end of its life.
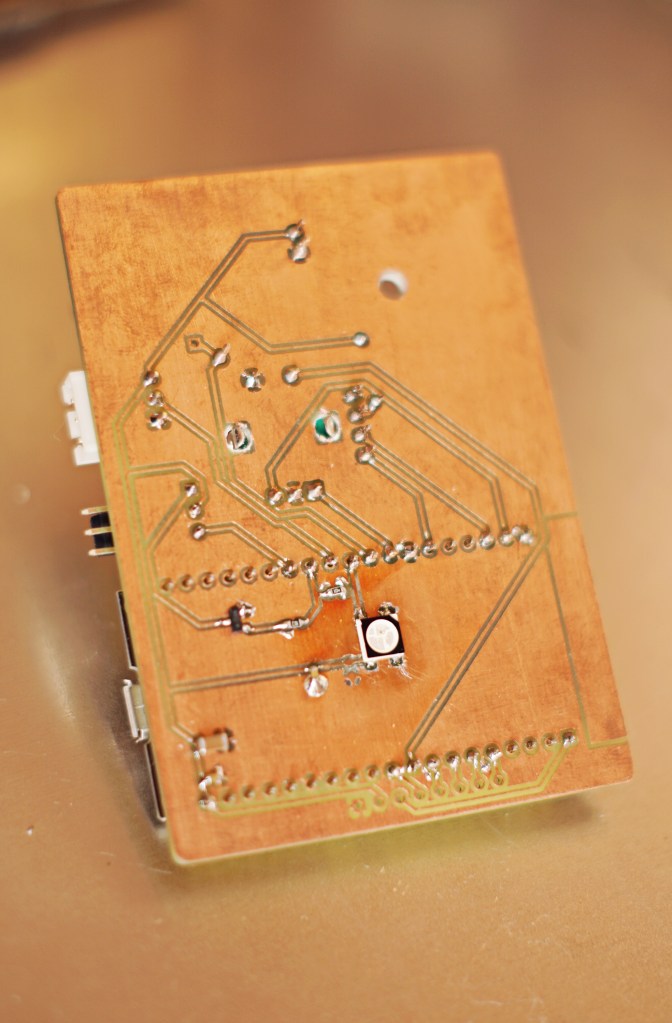
To make the Cave Box glow I use an addressable LED soldered directly to the back of the PCB, there is a part on the case that guides the light into the body of the Cave Box.
There is an unsoldered header on the board, with GPIO, power and ground pins, these haven’t been assigned to anything and are there for people to modify the Cave Box, making it really easy to add additional sensors or outputs or really whatever you want. There are also pads to connect another ultrasonic mister board, so I (or you if you’re handy with a soldering iron) can easily add a second ultrasonic mister, doubling the amount of humidification the Cave Box can accomplish. I intend to release this add on device for people who live in particularly dry climates, or who want to have a really big fruiting chamber.
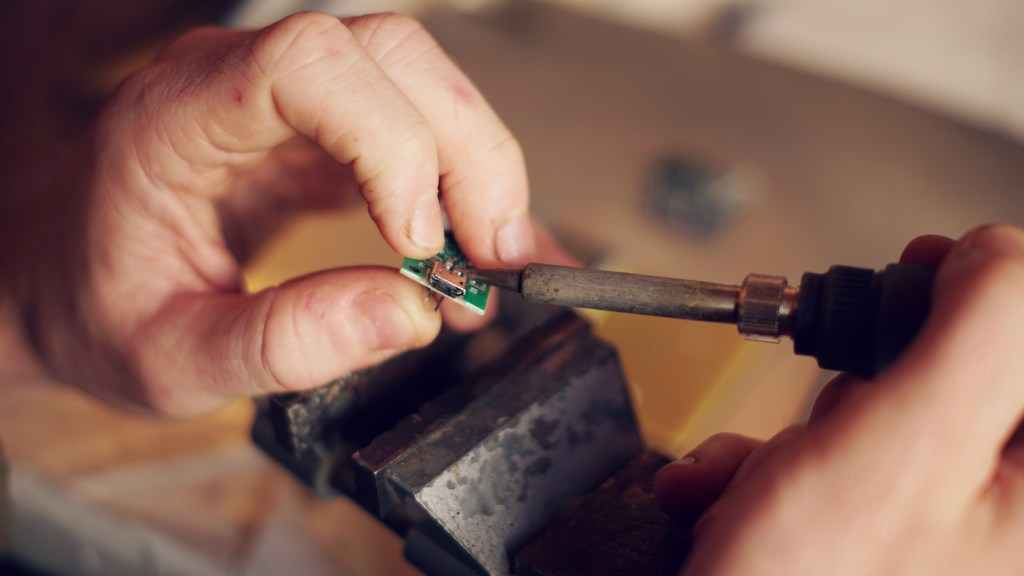
I made many prototype circuit boards on my milling machine. It’s a bit old fashioned making your own circuit boards nowadays but I really like it. It allows me to quickly make prototypes without having to wait weeks for circuit boards to arrive from China.
A big thanks to the developers of Kicad, the open source circuit board design software I used for this project.
